This page contains instructions for connecting and working in the system Studia3D aggregator. If you notice an error or inaccuracy, please immediately notify us by e-mail aggregator@studia3d. Com.
- How to connect to the system Studia3D aggregator
- How to add your product to the site for sale
- How to add your 3D model to a website for sale
- How to take orders for 3D printing
- What to do in case of a breakdown or high load of equipment
- Work in the personal account of the seller
- Who makes delivery for the client in the seller’s personal account
- How to mark that an order is ready in the seller’s personal account
- How to recover the password to the seller’s personal account if you have forgotten it
- How to withdraw funds from the seller’s personal account
- Working with order statuses in the seller’s personal account
- Working in the manufacturer’s personal account
- How to take a production order for work in the manufacturer’s personal account
- How products are shipped in the manufacturer’s personal account
- How to recover the password in the manufacturer’s personal account if you have forgotten it
- How to withdraw funds for completed orders in the manufacturer’s personal account
- Working with order statuses in the manufacturer’s personal account
- How to change production location
- Consultation with a specialist
How to connect to the system Studia3D aggregator.
To work in the system Studia3D Aggregator you need to go through the process of registration and verification by administrators. To apply for registration, you must go to the main aggregator page. On the main page of the aggregator, you must click on the “Register".

The system will redirect you to the registration page, where, first of all, you need to fill in all the data and submit an application.
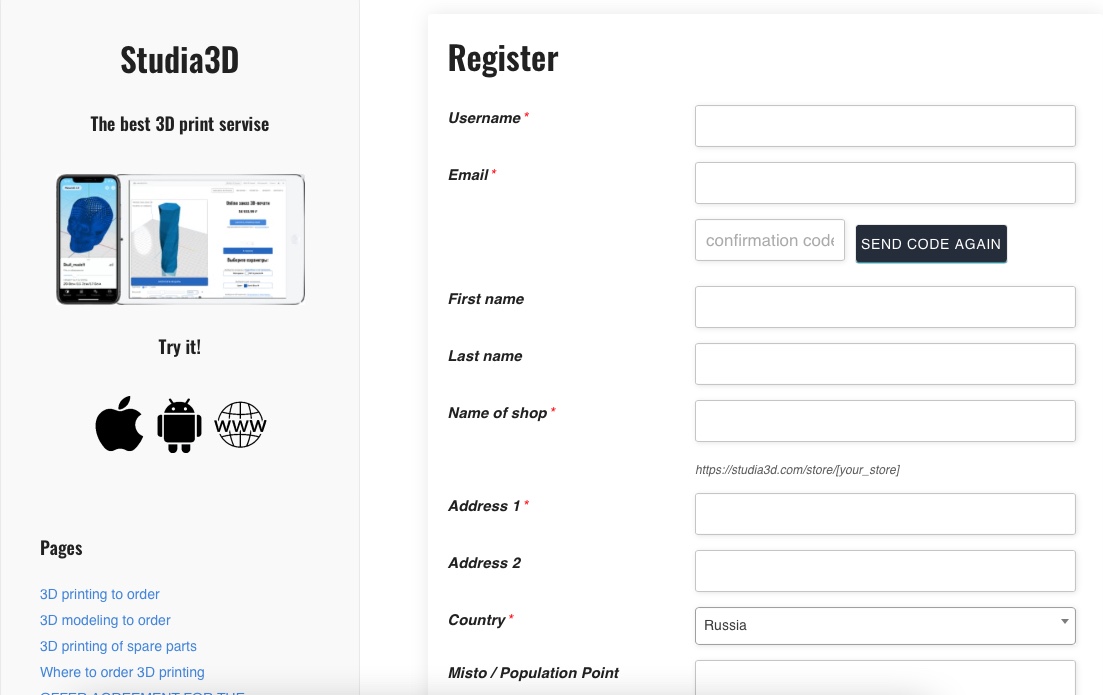
After Infill in the required data, click on the "Submit" button.

Immediately after Infill in and submitting the required data, you will receive an email confirming that the administrators have successfully received the data. If all fields have been filled out correctly, the registration process will go quickly. After checking all the data and successfully registering as a seller, the corresponding e-mail will be sent to you. Now you can place your products and models on the site for selling goods Studia3D. If during the registration process you indicated yourself as a product manufacturer, an additional personal account will be created for you, available at https://aggregator.studia3d.com /.
Please note that to publish products and to fulfill orders for the manufacture of products, you must use two different personal accounts!
Seller's office Manufacturer's office
Seller's personal account
To place products or 3D models with the system Studia3D Aggregator You need to go to the user's personal account by clicking on the appropriate button on sellers page.

In the seller's personal account, you can view which products were purchased by customers and the list of orders. To add or edit your products, use the "Products" tab.

Manufacturer's personal account
If you want to receive orders for 3D printing, then at the time of registration you need to put the necessary mark.
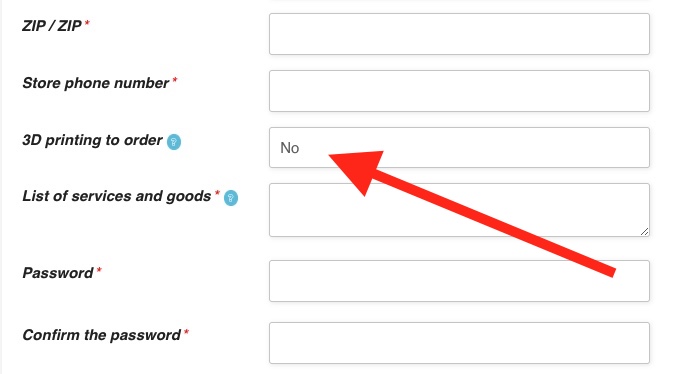
After the administrator checks your account and clarifies all the data in the product list, you will have an additional manufacturer's personal account. In the future it will be necessary set up correctly personal account and enter all the necessary data for conducting activities.
How to add your product to the site for sale.
To press your product you need to go to the list of products in seller's personal account and click on the “Add new product” button.

On the page for adding a new product, enter all the blank fields. You can choose the type of product if it has several colors or has any changing article. However, we recommend adding different colors as separate products. This will allow your products to index better. Indicate if your product is virtual, in case delivery is not required (for example, 3D model or software). Check the box if the product is downloadable.
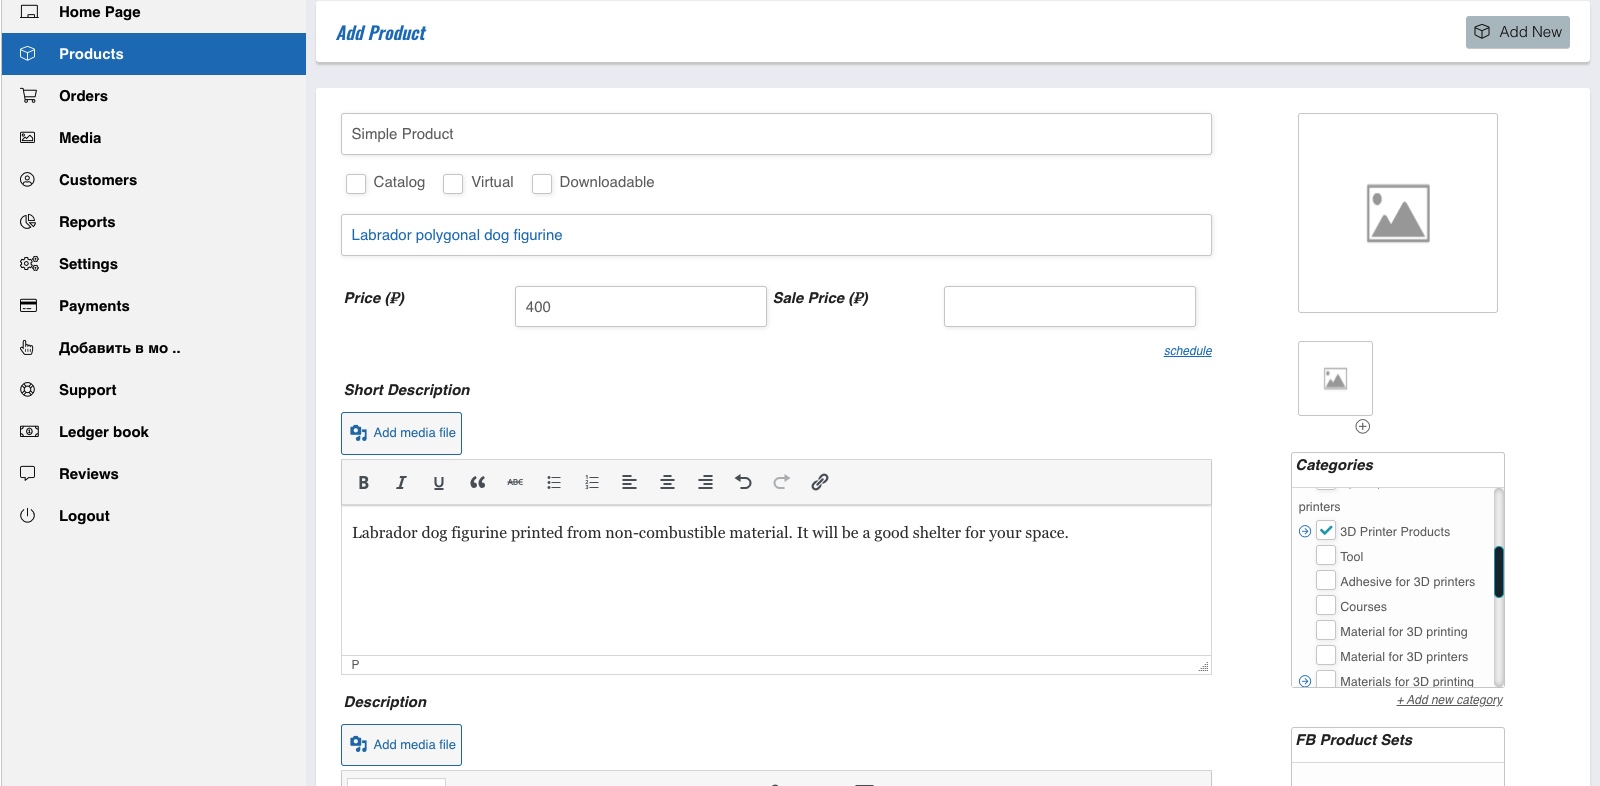
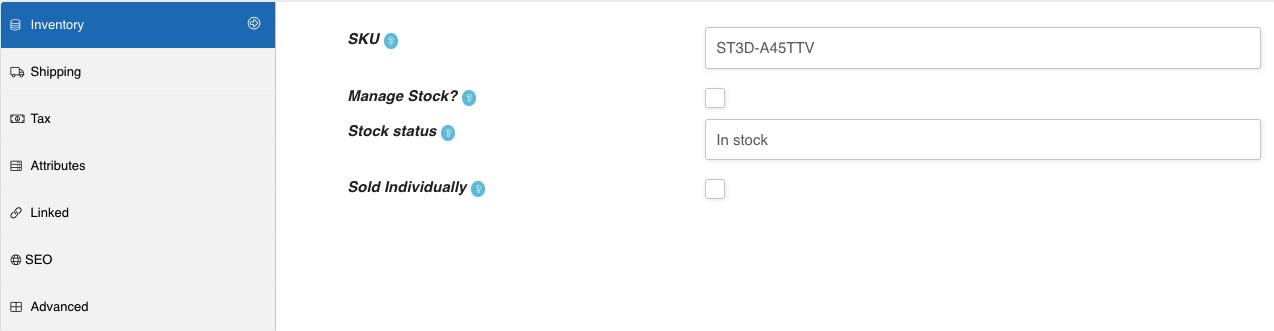
Don't forget to mark the product category on the right side of the page. If you did not see the required category, you must specify the closest one by semantic topic and send a request to aggregator@studia3d.com with a request to create a new category. After reviewing the application, a new category will be created and you will be able to change the category of your product. Be sure to post "Product Image". All product images (except 3D models) must comply with the aspect ratio of 900x900. For image processing, we recommend using specially program... Carefully ask the SKU of the product. Indicate the availability of the product, if the product is available in unlimited quantities, or indicate the quantity in the remainder.
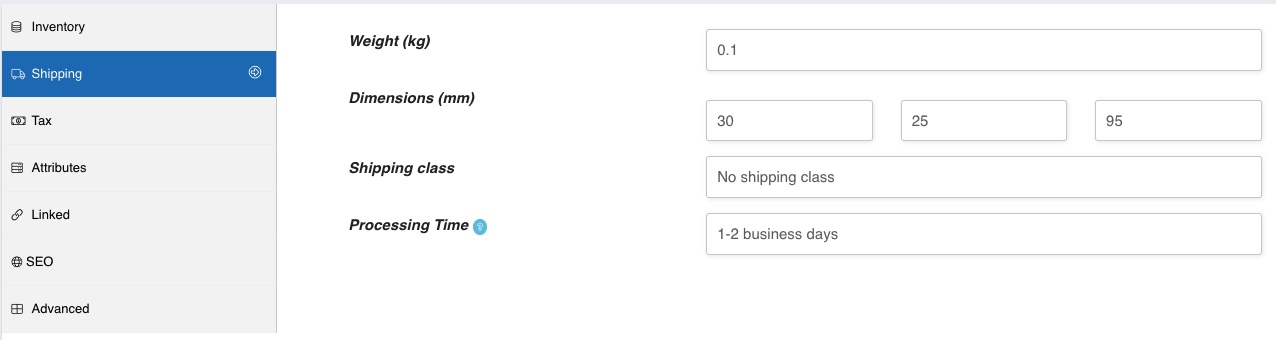
Specify product parameters for calculating delivery.
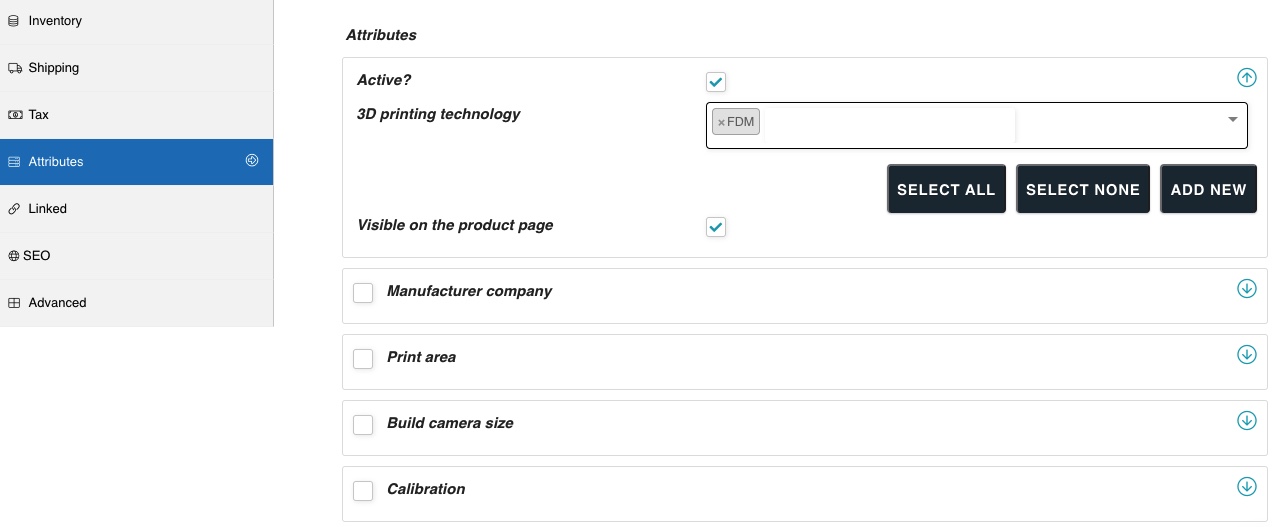
Add all possible attributes of the product.
In the short description section, you must specify only the basic information about the product in the amount of 15 to 20 words. Use only basic information that briefly describes your product. All basic detailed information about the product must be indicated in the general description of the product.
After adding all the data, you can send the product for verification.

After verification, the product will be published on our site.

If necessary, you can use the bulk import of goods to our site. To do this, will help you instructions for adding items in bulk via CSV file.
Pay attention! After successful registration, you must specify the correct address in the settings of the seller's office.

If these fields are left unattended, the system will index products incorrectly, and purchase orders will not be received at all.
How to add your 3D model to a website for sale.
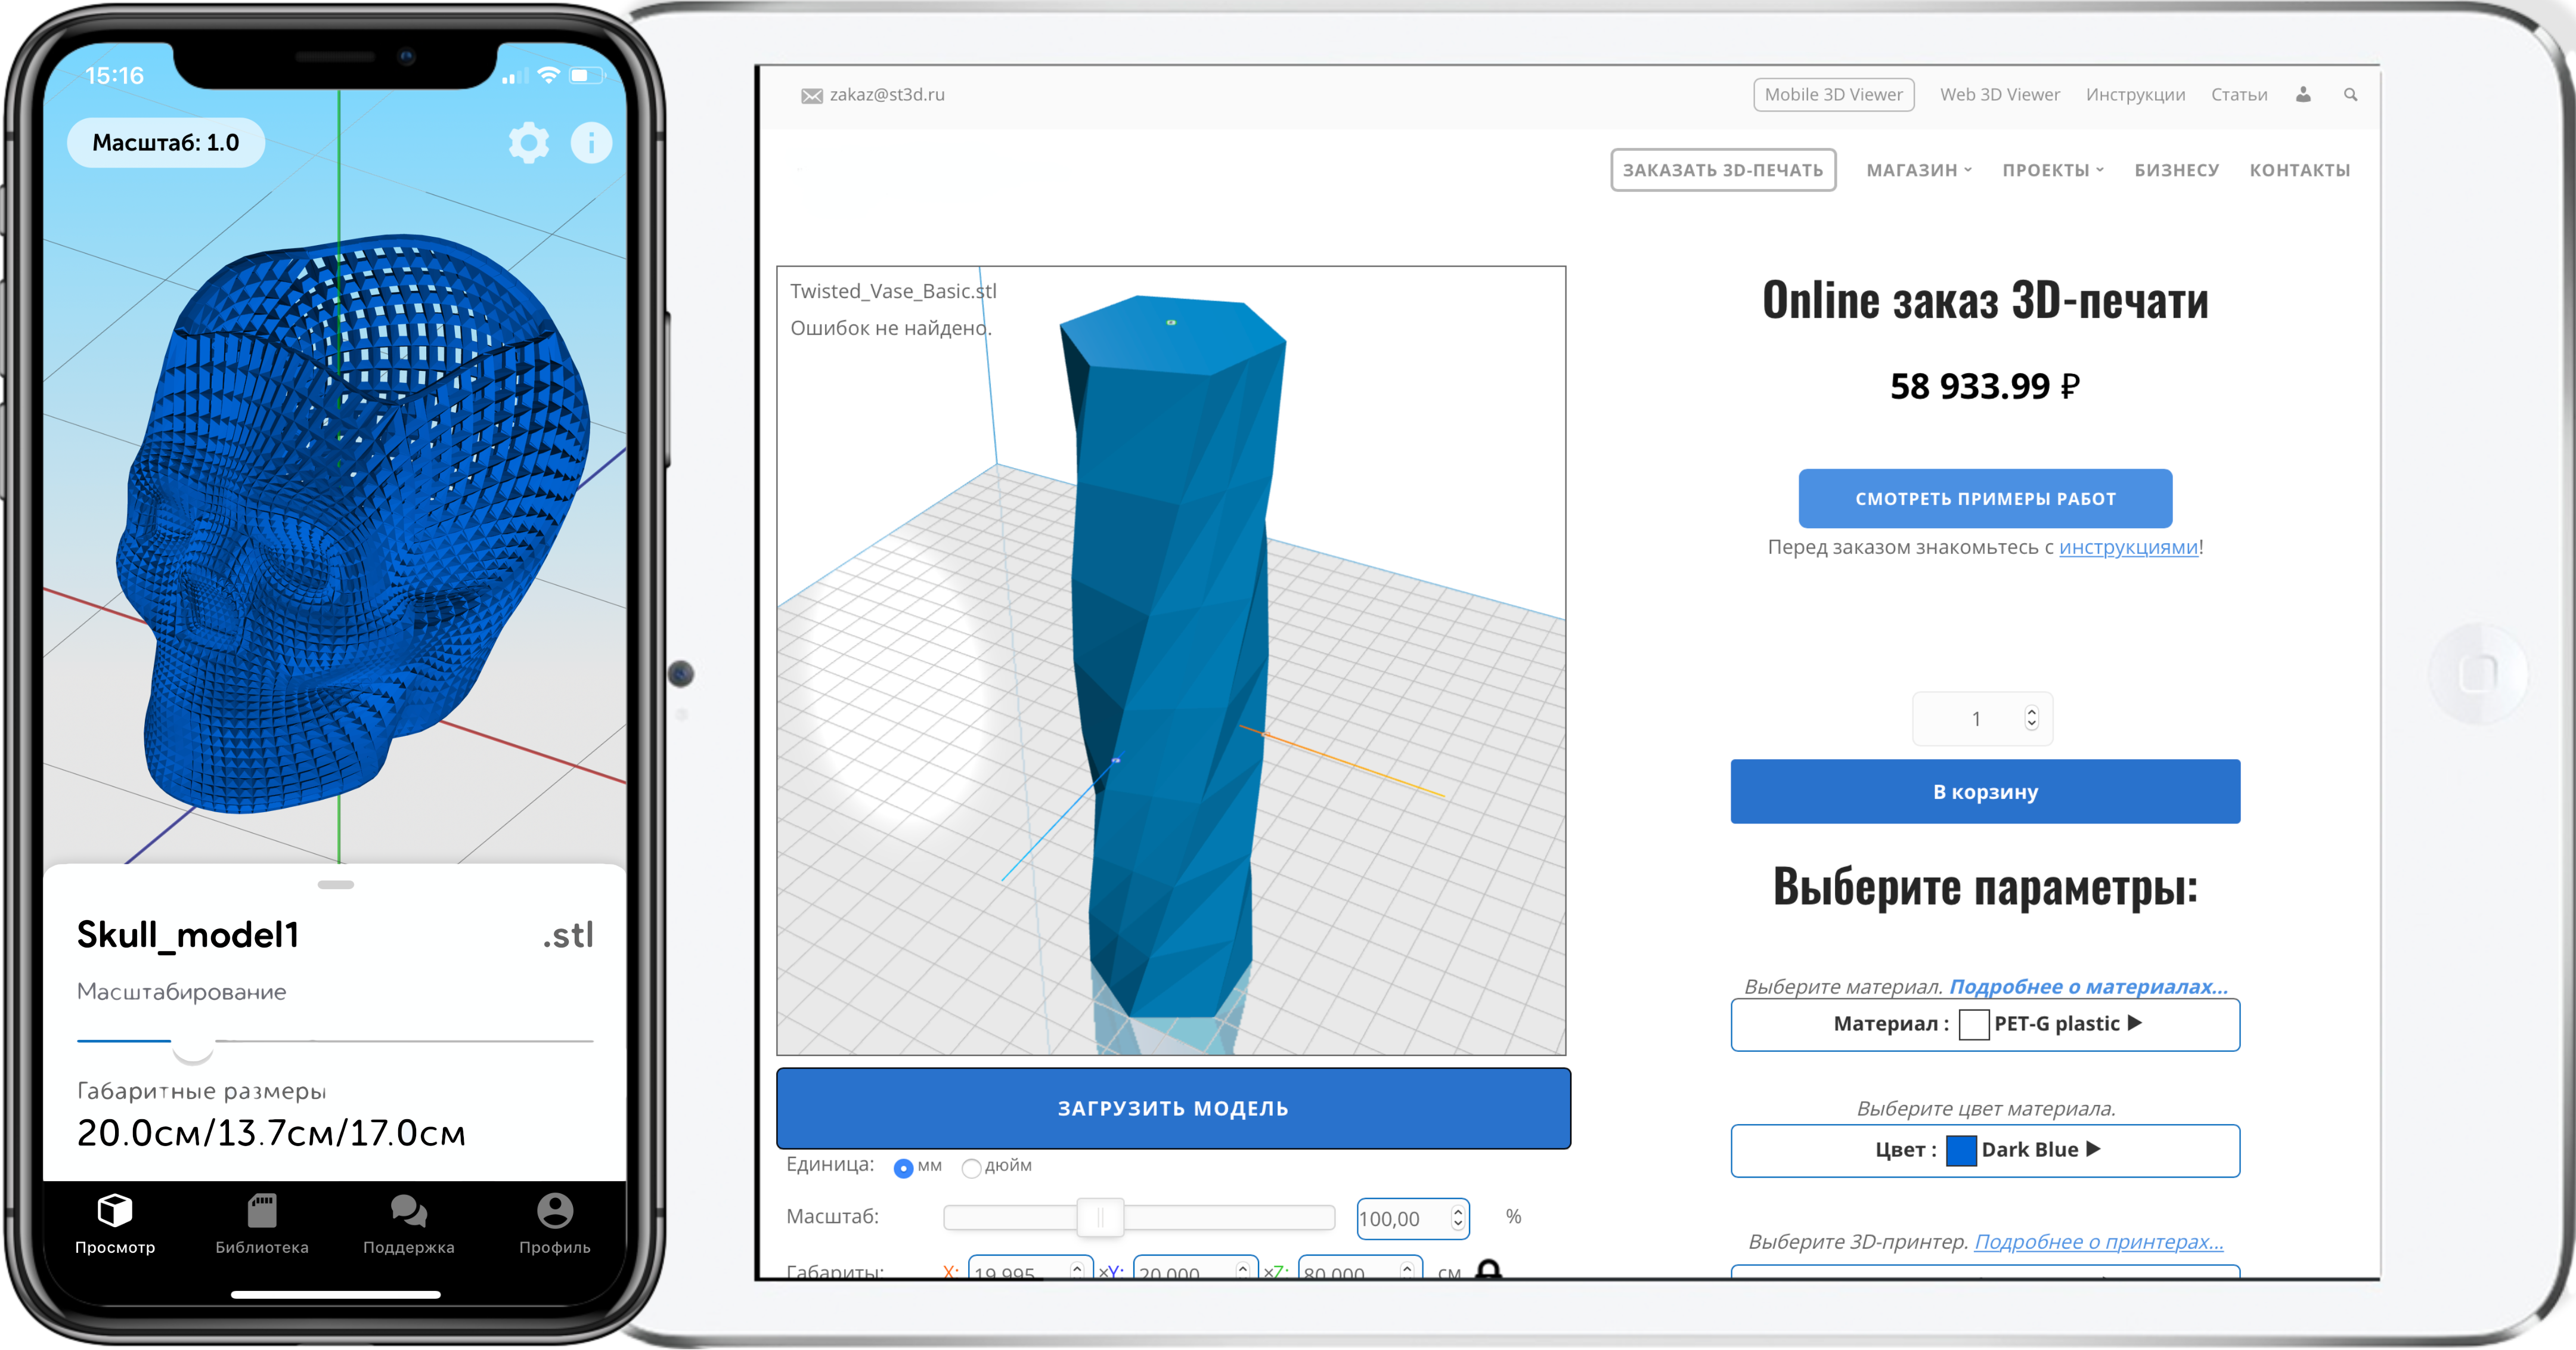
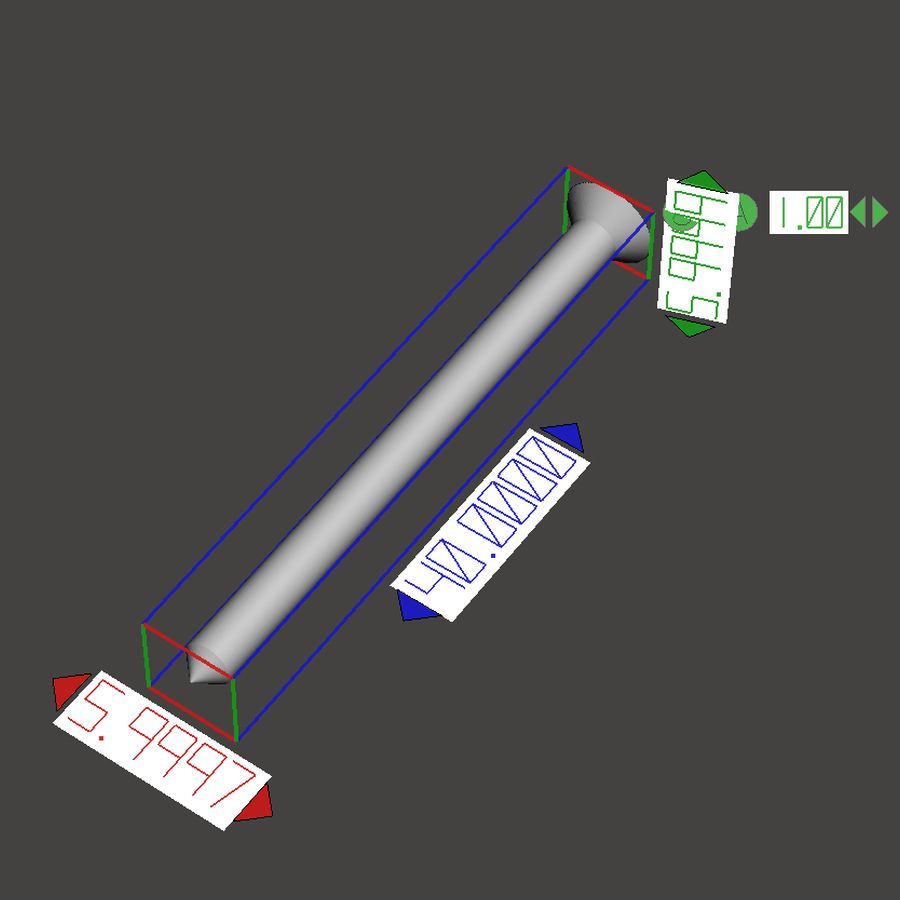
In the window for adding a new product, you must enter the name of your 3D model in the format “{name} - 3D model”. Below is a window for entering an extended description of the model. Include an extended description of your model in the text for this window. Provide as much information as possible. As a rule, this block also indicates the overall dimensions of the 3D model. To view the overall dimensions of the model, you can use a program that supports working with STL files. Examples of programs. The image below shows how to view the overall dimensions in the program meshmixer.

It is necessary to understand that a 3D model is a virtual product that cannot be taken anywhere, but it can be downloaded. Therefore, a mandatory step is to put the appropriate checkboxes.
Enter the name of the file (the client will see it). Click “Add File” to upload your model file.

You are taken to the file download page. Upload your 3D model. Please note that the model must match requirements for 3D models for 3D printing... Make sure the model is optimized. Don't try to add high poly models. If your model takes a very long time to load on the product page, then moderation will not be passed. After uploading the file, select it to generate a link to the site. This link will be opened to the customer after the purchase of the model.

An example of a screenshot with the required aspect ratio of 900 x 900, taken from the edit tab of the model view on the site. It is advisable to use the MeshMixer program or ours to create a screenshot. 3D model viewer.

The customer should not be able to add a 3D model to the cart multiple times. The number of one model cannot be more than one. Therefore, it is necessary to check the box, which will remove the option to select the quantity for the models.

If you have finished adding information and adding all materials to the site, you can submit your new product for publication. After submission, the model will be reviewed by the administrators, and after a while it will appear on the site. Before publication, your model will be worked out in terms of advertising.

In order to copy and duplicate the product, use the separate button “Copy to a new draft”.
Please note that if your model is optimized for 3D printing, has a good optimization in the number of polygons, and the weight of the model is less than 50 megabytes, then after checking and publishing the product card, a button for viewing the 3D visualization of the file will appear in the upper right corner of the main image of the card .

By clicking on this button, the client will see the full visualization of the model and will be able to view the model from any angle.

How to accept orders for 3D printing?
By connecting to the system as a counterparty for accepting orders for 3D printing, you agree with operating conditions of the system... When distributing orders between contractors, all models are thoroughly checked, so you can receive only high-quality models suitable for 3D printing using your technology. After the successful completion of the first order, an agreement will be concluded with you for working in the system and for the possibility of making payments to your legal entity. In case of violation of the deadlines or non-fulfillment of the order for 3D printing, your account will be disabled without the possibility of account recovery.
If you have filled in correctly margins when registering, then after a while, after checking your account, you will be given access to an additional manufacturer's personal account. In order for the system to distribute orders to your account, in the manufacturer’s personal account you need to indicate all the data for making mutual settlements with the system.

In the settings of the manufacturer’s personal account, you need to find a block with a selection of 3D printers and the material that you plan to use to fulfill orders for the manufacture of products. It is necessary to specify the materials according to the material ID and color on material selection page. It is necessary to specify machines in accordance with the equipment ID on equipment selection page.

If you did not find the required 3D printers on the presented pages, you need to apply for registration of a new 3D printer in system. If on the presented pages you did not find the necessary materials, you must apply for registration of new material in system. We will review your application and after verification we will add new positions to the system. After selecting the required attributes, click “save”. After verification, after a while you will start receiving orders.
Refer to the description for recommended print settings and modes. of each material.
If you have not previously worked with 3D printers, we do not recommend accepting orders from the system. This can lead to marriage and disconnection from Studia3D aggregator. Before working on the production of orders, we recommend that you go through 3D printing courses.
What to do in case of equipment breakdown or high load?
If you are temporarily unable to accept orders for 3D printing, you must immediately notify the administration Studia3D Aggregator by enabling vacation mode in the system settings. To do this you need to go to settings. To suspend the supply of goods, go to the “vacation mode” tab. Select the required settings. In the case of manufacturing products, simply remove 3D printers in your personal account settings.
Work in the personal account of the seller.
In order to go to the seller's personal account, click on the button Seller's office on the main page seller page.
After clicking and successful authorization, you will be taken to a page where you can see a list of your orders and a sales report for the period. To navigate in the seller's office, use the menu on the left of the screen.
Who makes delivery for the client in the seller’s personal account?
In the process of forming and paying for the order by the client, an order card will be sent to you by mail, in which the delivery column will be indicated. If at this point the delivery price is 0 rubles / dollars / euro, you do not need to make delivery. Our couriers will pick up the order themselves and deliver it to the client. After completion in your personal account, you need to make a mark on the execution of the order by clicking on the "Completed and sent" button. In the event that a specific delivery cost is indicated in the “delivery” column, you need to deliver the order to the address indicated in the order card. Shipping cost is formed based on the cost calculation transport companies through the appropriate API and selects the minimum one. Please note that when packing your goods or orders, the packaging should not contain any logos, branded stickers, scotch tape, business cards and similar things from the corporate identity of your company.
How to mark that an order is ready in the seller’s personal account?
If you have completed an order, you need to change the status of the order in the order list in accordance with the order number. Please note whether or not it is necessary to send the order to the client. More about order statuses.
If you have any questions, please write them to us by mail aggregator@studia3d. Com.
How to recover the password in the seller’s personal account if you have forgotten it?
After opening the registration window, you must click on the “Forgot your password?” button.

Next, you need to enter the email you specified during registration. Next, expect an email with a link to measure your password.
How to withdraw funds from the system in the seller’s personal account
In order to do this, you need to go to the “Payments” tab in the seller’s account. Next, you need to click on the “Withdraw” button. Enter the amount and submit a withdrawal request. Detailed instructions for withdrawing funds are described in separate article.
Working with order statuses in the seller’s personal account
When you received the order, it was assigned a number No.XXXXX... The order is automatically assigned the status "Performing the shaping". We remind you that you need to set the status “Completed”So that we can make sure that the order is assembled and ready to ship. If the status update does not take place, you risk being disconnected from the system.
If for some reason you cannot fulfill the order on time, please indicate the status “Returned».
After completing the order and transferring the order to the transport service, you need to set the status to "Completed».
Status "Pending payment»Is set automatically if the client has issued an invoice for payment to a legal entity, but has not paid for it. During this time, you can book an item so as not to sell it to another customer. After paying the invoice, the status “Performing the shaping”Will be installed automatically.
Working in the manufacturer’s personal account
In order to go to the seller's personal account, click on the button Manufacturer on the main page aggregator page.

After clicking and successful authorization, you will be taken to a page where you can see a list of your orders and a sales report for the period. To navigate in the seller's office, use the menu on the left of the screen.

How to take a production order for work in the manufacturer’s personal account
In the case of an offer to accept an order for work, you will receive a notification to the e-mail specified during registration of the manufacturer's personal account. The offer will be available in the manufacturer's personal account in the "offers" tab.

To accept an order for work, you need to go to the generated offer.
Please read the task carefully and make a qualitative assessment of your capabilities to complete this order. Pre-download the 3D model from the offer and check it. If you are ready to accept the order for work, you need to click on the appropriate button in the offer.

If for some reason you cannot take the order to work, you must cancel the order with the obligatory indication of the reason.
How products are shipped in the manufacturer’s personal account
After accepting the order for work, the order status will be changed, and the order itself will be displayed in the “Orders” tab.

You need to make an order in accordance with the technical specifications. After the successful production of products on order, it is necessary to mark the completion of the order in the manufacturer's personal account. To do this, you need to go to the “check” tab in the order and click on the “Order completed” button.

The system will ask you to upload photos of manufactured products. With tips for taking photos, you can read the rules work in the system.

Upload photos, write a comment on the order, check the products for compliance with the requirements and click on the “confirm completion” button. The order status will be changed to “Submitted for verification”, and in the “Checking” tab you will see the verification status. Verification takes on average 1-3 business days.

If the order does not pass verification, you will receive a notification and see the “rejected” status in the “Verification” tab. The status of the order will be set to “Under finalization”

In this case, you need to correct the deficiencies in the order and send it for re-checking. To do this, after correction, click on the “order completed” button again and upload photos of the corrected products.

If the order is successfully verified, the order status will be changed to “Awaiting Shipment”.

Additionally, in the order you will see the shipment number and the opportunity to download an invoice for delivery of this order to the client. After submitting the order, the status will automatically change to “Completed”, and you will be credited for completing this order.

For information on how to withdraw funds from the system, read separate article.
How to recover the password in the manufacturer’s personal account if you have forgotten it
After opening the registration window, you must click on the “Forgot your password?” button.

Next, you need to enter the email you specified during registration. Next, expect an email with a link to measure your password.
How to withdraw funds for completed orders in the manufacturer’s personal account
In order to do this, you need to go to the “Finance” tab in the seller’s account. Next, you need to click on the “Withdraw funds” button. Enter the amount and submit a withdrawal request. Detailed instructions for withdrawing funds are described in separate article.
Working with order statuses in the manufacturer’s personal account
When you receive your order, it is assigned a number. At the moment when the order is offered by the system in the “Offers” tab, the order is assigned the status “On distribution" We remind you that within 4 hours of receiving the offer you must accept the order or refuse it. Otherwise, the order will be sent as an offer to another supplier. If you refuse an order, the offer will be hidden and you will not see this order.
If the order is successfully accepted for work, the order status will be changed to “In the process“. This status means that you can start the order.
If for some reason you cannot complete your order on time, the status in the system will be changed to “Stopped" And subsequently the order will be deactivated and your account will be blocked.
After sending the report on the order for verification in the system, you will see the status “Submitted for inspection".
If the order has not been verified, you will receive a notification and see the status “Under revision"
After successful acceptance of the order, the system administrators will set the status “Awaiting shipment"
After transferring the order to the transport service, the status will be automatically set to "Completed».
How to change production location
There is a situation when the production workshop, and, as a result, the location for shipment of manufactured products changes. If this situation occurs, you need to change the location in the system. To do this, you need to go to the manufacturer’s personal account and enter the personal information editing mode.
In your personal data you will see a separate field “Address”, where you must make changes indicating the actual address of the production.

Additionally, at the very bottom of the page you will see a map with the ability to search for addresses for ease of working with the map and addresses on the map.

When performing a search, you should pay attention to the fact that the search bar only allows you to find an address. When you select the suggested options, the system displays the found address. But this does not mean that you have installed it. To select a new location, you need to set a mark on the map so that the system can register the new production coordinates. After correctly establishing the coordinates, you will see a mark similar to the image below.

Don't forget to save all changes you make.
Consultation with a specialist
If you don't understand something, you can always ask a question to administrators.


Author: Studia3D aggregator
More articles from Studia3D aggregator